Friday, December 30, 2011
2011 Year End Top Ten
I noticed a lot of folks posting a year end review around Blogland and thought I'd join in the fun. So here is a list of the top 10 Life in Wonderland posts from 2011 - enjoy!
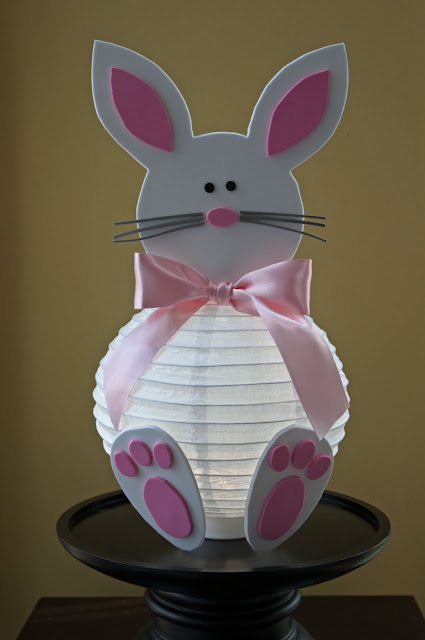
#10 - Easter Bunny Lantern
#9 - Tale of Two Birthday Party Invitations
#8 - DIY Valentine's Day Cards
#7 - Turkey Lantern
#6 - Burlap Easter Basket
#5 - Superbowl XLV Decor
#4 - Bandanna Wreath
#3 - Fruity Valentines
#2 - I Heart Kisses
#1 - DIY Baby Shower Favor
Hope you have a fantastic New Years - looking forward to a ton of amazing crafting in 2012! Linking up to:
Friday, November 25, 2011
Mrs. Claus Card
I thought it would be fun to make a card in honor of a woman who is routinely overlooked this time of year...Mrs. Claus!
Because I'm about out of fresh card ideas, I used the same technique as I did to make this card and this card. The one difference is that I gave Mrs. Claus an updated, blinged-out look by using red glitter foam paper.
I think Santa would approve!
Because I'm about out of fresh card ideas, I used the same technique as I did to make this card and this card. The one difference is that I gave Mrs. Claus an updated, blinged-out look by using red glitter foam paper.
I think Santa would approve!
Wednesday, November 23, 2011
Lollipop Turkey
There are going to be a number of young kids who will be feasting with us tomorrow, so I came up with a little craft to keep them occupied for a while...a lollipop turkey.
Almost too cute to eat! This is a super easy craft - here's what you'll need:
Lollipop
Googly eyes
Foam or construction paper (I used the following colors - brown, black, yellow, red, tan and gold)
Glue
Ribbon
Pre-cut the shapes and then allow the kids to glue them on.
I cut all of the shapes freehand - no need to be exact, just have fun with it!
Here are the basic shapes I went by:
The body of the turkey = Figure 8
The nose = Triangle
The wattle = Teardrop
The hat = Clay Flower Pot
The buckle = Square
To all of the US readers - hope you have a great Thanksgiving holiday!
Labels:
foam paper,
lollipop,
ribbon,
Thanksgiving,
turkey
Friday, November 18, 2011
DIY Turkey Placecard
I have a strange fascination with cookie cutters. Why "strange" you ask? Because I don't bake! But for some reason I still continue to purchase cookie cutters (that take up a fair amount of kitchen cabinet space I might add). I have figured out other ways to use them outside of baking - remember this, this and this? So, continuing in that tradition, I decided to make Thanksgiving placecards using cookie cutters.
I found this adorable turkey-shaped cookie cutter at my go to craft store (Hobby Lobby). It's a really great copper color which forced me to buy it.
I then found a copper colored piece of scrapbook paper and printed the names on it. After that I cut the paper into strips like this one...
Finally, I cut a small triangle at the end of each strip, gently folded it backwards and then attached it to the cookie cutter using glue dots.
Here's the placecard all dressed up with a place setting...
These are super easy to assemble and you can give the cookie cutters to your guests as favors - 2 for the price of 1!
Labels:
cookie cutter,
place cards,
Thanksgiving
Monday, November 7, 2011
Thanksgiving Turkey Lantern
I'm still in denial that Thanksgiving Day will be here in a couple of weeks! There are a ton of crafts that I was planning to make prior to the big feast, but it's not looking good. So, I decided to tackle the crafts that take no time at all to construct. First up: a turkey lantern...
You might remember the first time I made this kind of craft was for Easter - see it here. All you need to make this is a paper lantern, foam paper and hot glue. I used the cute little turkey below as a template, cut out the shapes and glued them directly onto the lantern. That's it!
Now on to the next craft!
Labels:
foam paper,
lantern,
Thanksgiving,
turkey
Monday, October 31, 2011
My Halloween Drama
Halloween is a huge event at my house to the point where costumes are typically purchased a month in advance. However, for reasons I'm still not quite sure of, I didn't start shopping for costumes until last week - insert "eek" here.
My oldest son decided that he wanted to be a combat soldier - easy. And, after much thought, my youngest son decided that he wanted to be the Blue Power Ranger - even easier, or so I thought. The last time I heard about Power Rangers was the late 90's, so who knew that every store in greater Atlanta would be sold out of Power Ranger costumes this year! I looked and looked and finally located one at Party City. I couldn't believe my luck, until the guy handed me the package and then I knew exactly why the costume had not been purchased...
No mask? Really? I frantically called my husband for advice and he assured me that I had enough crafting mojo to make a mask. So, with new found confidence, I purchased the mask-less costume. Here's my best attempt at making my kid a Power Ranger...
Can you tell what the mask really is? It's Iron Man!
I first spray painted the entire mask blue...
Then I cut the shape on the mask out of foam paper and hot glued it on - much easier than I thought it would be!
My son is completely happy with his costume - crisis averted! Hope you all have a Happy Halloween!!
Sunday, October 23, 2011
DIY Biz Card
Last weekend I had the opportunity to attend my very first blogger conference and it was a-mazing! I'm gonna devote a whole separate post about that event later this week because it deserves a serious shout out.
One of the things I learned prior to going to the conference was that I needed to be armed with a ton of business cards to share with all of the fabulous bloggers that I'd meet. Unfortunately the cards I owned only listed my website that is in desperate need of a makeover. So, the day before the conference, I decided to make my own business cards that listed my blog and Etsy store info. I knew this was a little risky given the fact that I'd never done it before, but I'm still in a "nothing ventured nothing gained" kind of mindset. So here's what I made...
I'd love to take full credit for this design, but it was actually inspired by this gorgeous card that I saw on Flickr.
I had to get feedback from my toughest critic (my 5 year old son), who quickly bashed the entire design. Here's how his critique went:
"Um Mom, why is the bunny on the front? Shouldn't it be the hat instead? If you keep it like that people will think your company is called 'Hare & Hatter'. I think you're confused."
Ouch! I tried to sell the design to my kid another way by pointing out how artistic it is to see the hat within the outline of the hare once you open the card. His response: "Yep, you're confused".
I'm not embarrassed to tell you that I actually spent an hour redesigning the card based on the input of a 5 year old. Seriously. However, at a certain point I realized that I didn't have that kind of time and went back to the original (some would say 'confusing') design.
I spent the rest of the night cutting out the silhouette of the hare by hand, but it was so worth it!
Monday, October 10, 2011
Nothing Ventured, Nothing Gained...
Two months after creating an Etsy shop, I finally had a chance to actually put items in said shop...and there was much rejoicing! So I invite you to pop over to my new digs and check out the merchandise here - more items on the way soon!
My plan is to start off selling party decorations - centerpieces, banners and wall signs. But I have a ton of ideas for coordinating items that I hope to offer as well. The first items listed in the store are all Halloween-themed, but here is a sneak peek of another product line that I'm working on...cowgirls rock!
Labels:
banners,
centerpieces,
Etsy,
Hatter and Hare Events,
party decorations,
wall signs
Thursday, September 22, 2011
Along Came a Spider Place Cards
I started pulling out Halloween decorations this week and stumbled upon a bag of spider rings that I bought on sale last year. I'm going to see how many crafts I can incorporate the rings into this Halloween. First up, place cards of course!
These are simple do-it-yourself place cards that can be made at the last minute. I started off by printing the name on a piece of cardstock.
Then I trimmed down the cardstock, folded it in half and cut a small slit next to the name. This slit will be used to hold the spider ring.
Simply slide the ring into the slit and the place card is done!
Wednesday, September 14, 2011
A Pile of Pumpkins
I live in Georgia and it's still 90 degrees outside, so I'm having a hard time grasping the fact that Fall is just around the corner. My son tried to sneak a pumpkin into our cart at the grocery store yesterday, but I just couldn't bring myself to buy one this soon. I felt so bad about not letting him have it that I came up with another way to give him a "pumpkin".
I first dug up this pumpkin-shaped cookie cutter...
Then I cut pumpkin shapes out of different types of fruit...wait, this picture makes it look like I only used cantaloupe right?
However this angle reveals that I actually used cantaloupe, honeydew and watermelon. I thinly cut the fruit and stacked them into a pile...
A pile of pumpkins - my son loved them!
Thursday, September 1, 2011
DIY School Envelope System
It has taken most of my adult life for me to figure out that the key to stress-free living is organization! I now realize that everything should have a place to live - car keys, cell phone chargers, whatever. When there is a place for things to return to every time, then my life becomes way easier to manage.
Case in point, every time I had to send money into school with my sons it was always a major production because none of the things I needed (envelopes, pen, paper clips, etc) were ever right where they should be. Here's one example of a super simple system I now use when sending notes/money to school with my guys.
I'm sure you are all well aware of my hoarding issue by now. However, unlike the hoarders on TV, I actually use my hoarded items. I have an old calendar holder that I kept long after the calendar had expired. Here's how I converted the leftover board into a school envelope system.
In addition to the calendar holder, I also reused an old folder to hold the envelopes.
I simply cut out the shape of the flaps...
And then hot glued them onto the board.
I also cut an additional piece of the folder and attached it to the board to hold paper clips and binder clips.
Here's the finished product...
And here's the envelope that I made for school...
My guys have been in school for three weeks now and the envelope system is working like a charm...no stress!
Linking up to:
Subscribe to:
Posts (Atom)